Paragraph Styles
The next few sections deal with manipulating paragraphs with paragraph styles. Paragraph styles in OpenOffice Writer are hierarchically organized. You can see the hierarchy of all paragraph styles if you select Hierarchical from the menu at the bottom of the Styles and Formatting window.
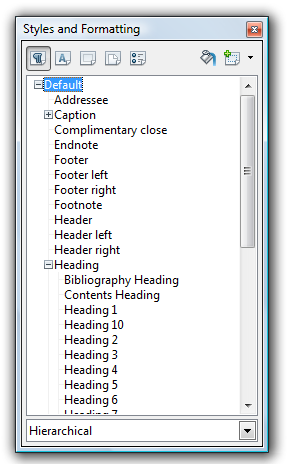 Figure 9: Hierarchical view of paragraph styles.
You can see that all paragraph styles are based on paragraph style Default. This means all paragraph styles “inherit” the settings of paragraph style Default unless one or more settings have been modified in a particular paragraph style or in one of its parent paragraph styles. For example, assume the font of paragraph style Default is Times New Roman and the font of paragraph style Heading (the parent of all heading styles) has been set to Arial. If you now change the font of the (hierarchically topmost) paragraph style Default to Garamond, then this change is inherited by all paragraph styles that use the Times New Roman font. However, in all Heading paragraph styles, the font Arial is retained.
Creating a New Paragraph Style
You will need to create a paragraph style for each type of text you want: text body, headings, footers, captions, etc. You do this using Paragraph Styles in the Styles and Formatting window.
From the Format menu, choose Styles and Formatting.
Click the Paragraph Styles icon at the top of the Styles and Formatting window.
Right-click a paragraph style for which you want to base your new style and select New.
Type a name for your new paragraph style.
Select a paragraph style you want to follow this style. For example, if you are creating a heading style, you most likely would want your text body style to be the next paragraph style.
Use the tabs in the dialog box to set the remaining paragraph styles.
Click OK.
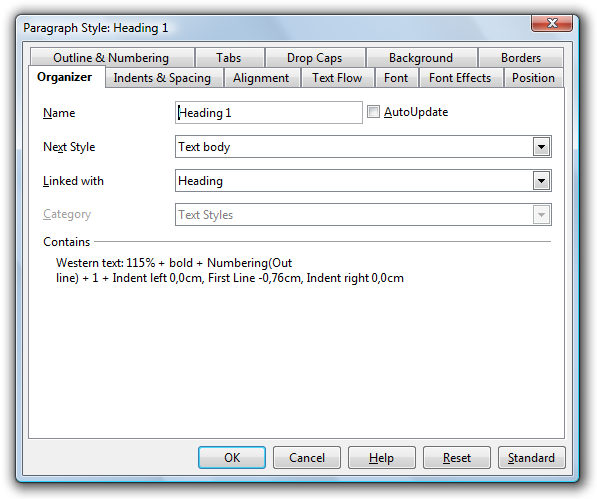 Figure 10: Creating paragraph styles.
Modifying a Paragraph Style
If you want to change the font (or any other characteristic) of all heading styles (or whichever style you wish), then you simply make this change in the parent paragraph style Heading.
From the Format menu, choose Styles and Formatting.
Click the Paragraph Styles icon at the top of the Styles and Formatting window.
Right-click the parent style you want to change and select Modify.
Use the tabs in the dialog box to make the appropriate changes.
Click OK.
A paragraph style can also be modified by placing the cursor in any paragraph with the desired paragraph style and selecting Edit paragraph style.
Numbered Headings
Using OpenOffice Writer you can automatically number all chapters and sections. To do this, each chapter has to be assigned one of the heading paragraph styles, Heading 1 to Heading 10 with the appropriate numbering style applied. Furthermore you can define the outline level for each paragrapg or paragraph style. This is very helpful when you create an appendix and use letters for the numbering.Frank Loehmann2009-07-15T18:31:28
3.1 allows to define outline level for each paragraph or paragraph style too. This is important to create an appendix i.e. starting with A. , B. ...
Frank Loehmann2009-07-15T18:38:18
This 'Outline' numbering is no good choice for those papers. It does not use the outline styles (Heading 1...n) so it will not be visible in the document index. We should reference to Tools-Outline Numbering only (see next page).
Creating a Numbered Heading Style
From the Format menu, choose Styles and Formatting.
Click the Paragraph Styles icon at the top of the Styles and Formatting window.
Right-click a paragraph style for which you want to base your new style and select New.
Type a name for your new paragraph style.
Select a paragraph style you want to follow this style. For example, if you are creating a heading style, you most likely would want your text body style to be the next paragraph style.
Click the Numbering tab.
Select a Numbering Style from the drop-down menu.
Click OK.
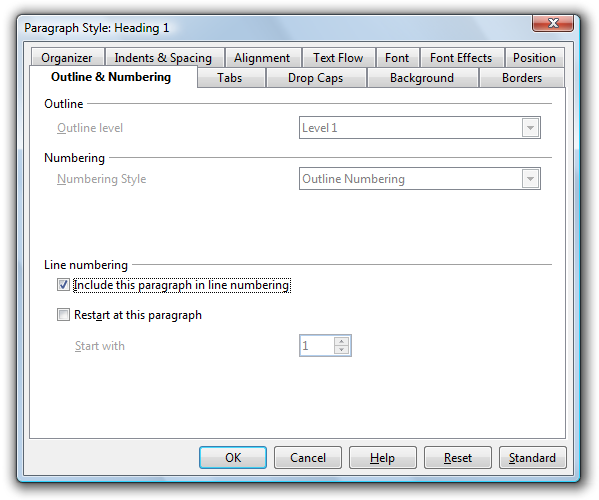 Figure 11: Creating a numbered heading
Frank Loehmann2009-07-15T18:42:33
Dialog has changed in 3.1
Setting Outline Numbering for Headings
If you've created a custom numbered heading style, you will need to apply the outline numbering to the style so Writer know which outline level each custom head belongs with. For example if you created Head1, Head2, and Head3 styles with numbering, you will need to tell Writer to apply level 1 numbering to Head1 (I.e., 1 Heading), level 2 numbering to Head2 (I.e., 1.1 Heading), etc.
From the Tools menu, select Outline Numbering.
On the Numbering tab, select a level and then select the heading that goes with that level.
Click OK.
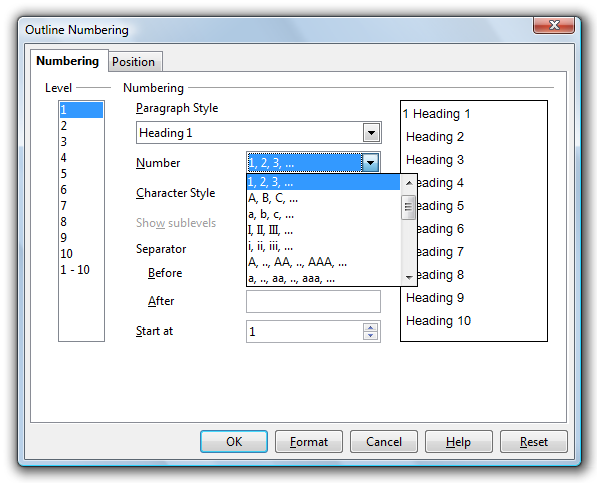 Figure 12: Setting outline numbering.
Cloning a Heading
Of course, there are introductions, literature lists, and appendices which are supposed to be treated as headings but either not numbered at all or numbered in a different way. The solution for this problem is cloning a paragraph style. Let's say, for example, that the Introduction is to use the paragraph style Heading 1, but without numbering.
Set the cursor into the paragraph Introduction and assign paragraph style Heading 1 to it with a doubleclick in the Styles and Formatting window.
Then click New Style from Selection icon in the top right corner of the Styles and Formatting window.
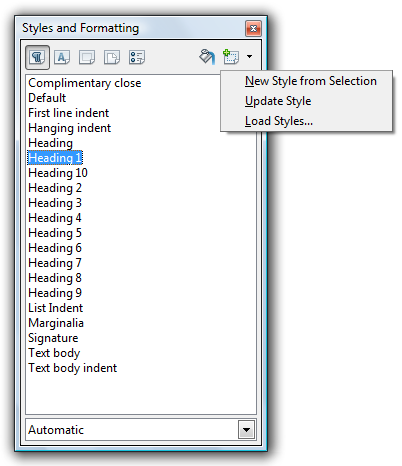
Figure 13: Cloning a paragraph style.
- Type a name for the new style (Heading 1 Without Numbering). Note that the new style is now a “child” of style Heading 1. Any modifications made to style Heading 1 will automatically be reflected in style Heading 1 Without Numbering.
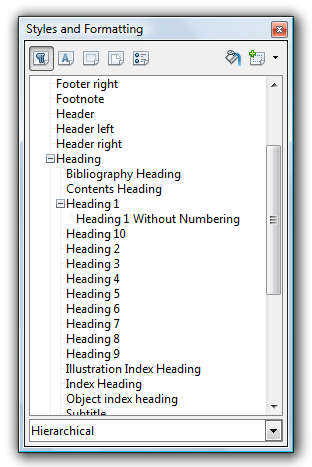
Figure 14: Child heading.
Right-click the Heading Without Numbering paragraph style and select Modify.Frank Loehmann2009-07-15T18:45:03
Outline level has to be set in to Level 1in the paragraph style dialog to see this unnumbered heading in the doc index.
Click the Outline & Numbering tab and select None from the Numbering Style drop-down menu. Set the outline level to level 1 in order to see the unnumbered heading in the document's index.
Click OK.
Indenting the First Line of a Paragraph
Indenting the first line of a paragraph is standard practice. However, this is often a matter of personal taste, or there may be a standard set.
From the Format menu, select Styles and Formatting.
Click the Paragraph Styles icon at the top of the Styles and Formating window.
Right-click the paragraph style you want to modify and select Modify.
Click the Indents and Spacing tab.
De-select Automatic and enter the indent size in the First line box.
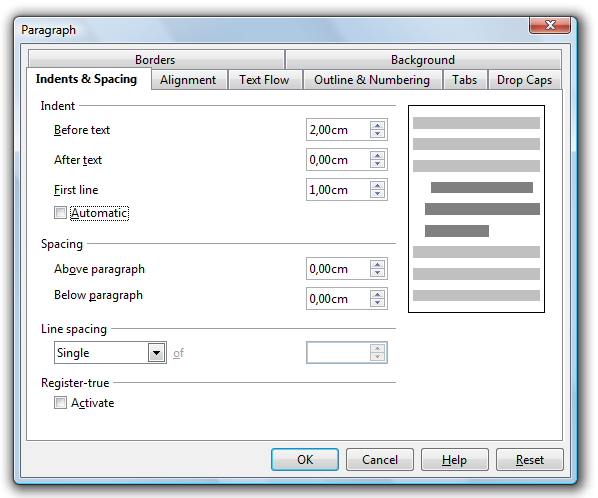
Figure 15: Indenting the first line of a paragraph.Click OK.
Another frequent practice is to indent, but not on the first paragraph after a heading or after an illustration. The best way to accomplish this is to clone the Text body style (see the Cloning a Heading section) and create a Text body indent style (see instructions above). For the Text body paragraph style, choose Text body indent as the Next style. Now, when you style a heading, the first paragraph following the heading will use the Text body style. All paragraphs after the first one will use the Text body indent style.
Starting Each Chapter on a New Page
It's common practice to start each chapter on a new page. To do this, you need to set paragraph style Heading 1 (or whatever style you are using as your chapter head) to start on a new page.
From the Format menu, choose Styles and Formatting.
Right click the paragraph style you want to modify and select Modify. You may need to click the Paragraph Styles icon to see all paragraph styles.
Click the Text Flow tab.
In the Breaks section, check Insert. Make sure Page is selected as the type and Before is selected as the position.
Click OK.